While I love to browse through Pinterest and other online sources for inspiration, nothing compares to thumbing through my favorite shelter magazines. Recently I spotted two projects I wanted to knock off. The first is something I saw in House Beautiful. It was actually an image from Baker Furniture {The Barbara Barry Collection}.


Snapped the above photo with my phone so I apologize for the quality. Do you see those frames? I LOVE them. I had just completed a DIY brass side table and knew I wanted to repeat the brass finish in a couple more spots so it really felt at home in the room. I have similar frames in my living room already . . . I just needed to add the brass corners. My first thought was to spray paint each corner. But then if I ever changed my mind, I would be stuck with the frames sporting some serious brass. So it occurred to me that I could actually spray the painters tape! Great for two reasons. I can remove it if I ever want to AND it is somewhat textured so it gives off more of a gold leaf effect then if I had just painted the smooth frame. Apparently, I checked my brain at the door the first go around. Do you see what I did there? I actually stuck the painter’s tape to the newspaper. Good one, Courtney! Really good. So that whole thing went out with the trash.
 Ahhh! Much better. I elevated the tape so it wouldn’t stick to the newspaper. Actually super embarrassed about this mistake. Oh well. Live and learn.
While that was drying outside, I marked off my corners. I used 2 3/4 inches as my measurement {just eye balled how much gold I wanted}. I made a pencil line where the tape would need to end.

Lay the tape very gracefully on the frame and be sure to overlap the edges. I used a width of tape that exactly fit my frame edges. Worked out great.

Because I had the tap overlap the edges, I could carefully snip where I needed to and fold the tape down to cover all of the inside black edges of the frame.

The nice thing about using tape is that you can move it if need be. It’s super easy to work out any creases as well.


BEFORE:
AFTER:

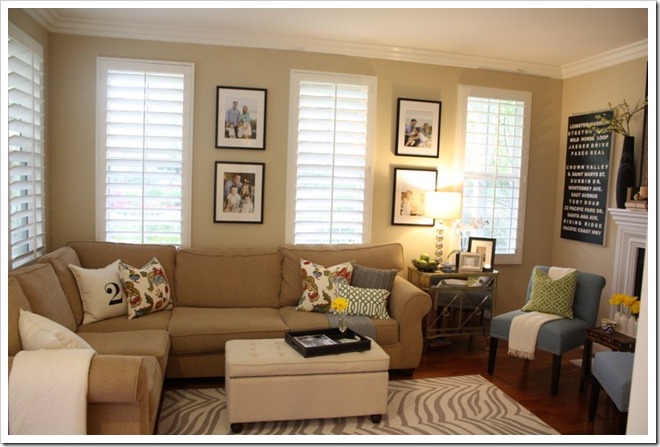
I wish you could see them in person! They have such a pretty sheen at night {above photo} but it’s tough to capture. So my magazine copycat project number one is done! And the frames are a nice compliment to this little number:

UPDATE OF THE SPACE:


For a tutorial on how I lengthened these drapes click here.
V.cool. Reminds me of campaign hardware but on frames!!
I absolutely love this! You did an amazing job! Seriously, awesome.
What? AMAZING! love them!
What a fabulous idea. I love it. Hugs, Marty
stunning! this is a must do!
Beautiful!! I love this — so simple 🙂
Pamela
PBJstories.com
Love, love love!
Oh good gracious alive! Look who is super clever! I love this, and the finished product is really pretty. Nice job!
It's official. You. are. brilliant. LOVE them!!!
I love this idea! Definitely going to borrow this one. Thanks for the inspiration.
I love this. I've actually have been wanting to try spray painting painters tape for a week or so now and am so glad you showed how great it turned out!
clever you are. love those so much.
What a cool idea, looks fab!
This is awesome! What a great idea! I totally would have done something like that.. taping the tape to the paper.. 🙂 I do everything twice!
Ok you are GENIUS! Even with the initial glitch, this is one of the smartest projects I've seen in awhile! LOVE it, girl.
Very clever. The results look great!!
Very clever. I love that it's something you can remove if you ever want to (but why would you? It looks awesome!)
Seriously genius. The outcome is great.
That is so cool, I never would have thought of doing that! I think you've inspired me to tackle another project around here!
Beautiful… I love this, Courtney~
That looks gorgeous! So clever to use tape!!!! I certainly never would have thought of that! Great job!
You are a genius…that is all 🙂 Amazing.
Love them! What a great idea.
Those are fabulous!!!!! how clever!!!
Who would have thought! This is fabulous so pretty! Thanks for sharing, have a fabulous Monday!
XO
Kristin
These look so great!! I am so impressed! They look exactly alike – so pretty!
What a great look!! Love how these make them look super high-end and with just a little tape…who would guess??
Looks so great!
What a cool idea! It looks really good!
Ok- this is genious! I absolutely love this idea! I also have this magazine and loved these frames. And now whenever you want to change out the look, you don't need to buy new frames to do it! You are my hero! 🙂
They look so high end! AMAZING – pure genius!
I actually noticed that ad too! I love what you did! I might attempt it… not sure I could get straight lines like you did! your frames look wonderful!
No way! You are so good!
I can't wait to see what else you have in store for us!
I absolutely adore this…I wouldn't have guessed in a million years that was painted tape!!! It looks completely amazing and so custom! I'm already fantasizing about how that would look on some white frames (c:
I love this. What an awesome idea Courtney!
Mandy
This is such a great idea!! So creative. Love it.
-Erin
DIYOntheCheap.blogspot.com
Brilliant, Courtney!! I'm so thankful bloggers are all about sharing! 🙂
pinned it, loved it, going to try to make it.
Brilliant idea to use the tape…great way to add the color without making it permanent!!
You are amazing, Courtney! These frames are beautiful! I would never have known that was tape. Love your family photos, too.
those frames are beyond wonderful!!
amazing!!!!
I absolutely love this idea, you're a genius! I would have never thought to paint the tape. Awesome!
That looks so stunning, C! Amazing project! I have six similar frames in my DR that i considered spraying gold to liven up…but i love your idea so much better!!!
Genius!! Love it.
Great idea Courtney. They look fantastic.
I still haven't received my March issue…boo. But, I love what you've done! Great idea!
You are a genius!! 1st your little brass side table -now frames! they look perfect and you would never even know that was blue painters tape!!
wow they look fabulous! such a great and easy project!
Wow! Something so simple like painting the tape…amazing! The frames look much more custom/expensive now. Kudos!
I love what you did the frames look wonderful. I am a new follower and I know I can definitively learn a lot from you.
great idea to use painter's tape!
Super fabulous!! Laughing so hard about the tape on the newspaper:)
Adorable and genius! What a fantastic idea. My head is spinning with all of options. Different colored frames + different colors of spray paint… black and pink, white and blue…the options are endless!
That is brilliant! What a creative idea!
Brilliant! They look so high end and I love the shimmer. Much more interesting now!
I'm doing this! What a cool idea!
So amazing, Courtney! Such a great idea!
Totally genius! So glad I found your blog!
Perfect, Courtney…just perfect…;)
Oh this was good!!!! Really good!!!
I know I already posted, but just wanted to let you know that I'm featuring this project tomorrow on my [so cheap, so easy] series. Love it! I'll link back to your original post.
This is so smart! So glad to find you. You are brill!
Wow, awesome project! So easy (and cheap!) to achieve so much look. Thanks for sharing this great idea.
I love it and will do it ! Can you show how you overlap two strips in order to cover symetrically each corner ?
Many thanks
wouldnt it be easier and better off to mask off the frame and then paint the frame? what am i missing?
wow a great idea! I love how this turned out!
What a great idea. Such a simple update for an otherwise plain frame.
Love this idea! they look fantastic!
Any idea if this would work to cover the entire frame?
I have seen these corners done with a gold leaf pen, but I love the idea of using something non-permanent! I have two frames in my house screaming for this to be done to them! Thanks for the inspiration…
http://www.lifelovelarson.blogspot.com
I'd love to see close up picture shots of the photos you have hanging up on your wall. That would be cool.
-Zane of ontario honey
I LOVE this!! I am going to have to try this someplace! Thanks for the great idea 🙂
I really enjoyed this project and hope to try it one day soon. Could you share what paint color you used?
thank you
this looks amazing!! great job.
Love this idea! Simple yet impactful.
Thanks so much for this great tutorial and inspiration! I love this, it adds a really modern touch and creative edge to the frames in my office. Today I posted about the version I made (inspired by yours) and linked to you as the original source, right here: http://paintingsunny.com/2013/05/03/before-the-blog-pinterest-inspired-projects-part-iii/
Thanks for the inspiration!
http://lifelovelarson.blogspot.com/2013/05/diy-gold-corner-frames.html
I always like to read a quality content having accurate information regarding the subject and the same thing I found in this post. Nice work.
Curtains
Beautiful! It's amazing how that little detail adds so much character to your walls! Great idea with painting the tape! I just saw a tut where they used gold leaf, but this looks just as nice and its much easier! Totally doing this with my ikea frames 🙂 Thanks!
I am working on a gallery wall and wanted gold tips on my frames. I LOVE this idea of using painters tape instead of actually spraying the corners of the frame. You made my life SO much easier today as I approach this project! THANKS! 🙂
Fabulous DIY! I saw these on your Instagram feed and had to come check out the DIY. This couldn't be easier. It's now on my to-do list. Thanks for sharing!
Great, ingenious idea! I've been trying to figure out what to do with a frame that needs to "go with" but not match gold frames in my dining room. And you provided the answer. Thank you!
Hi Courtney, I love the way you decorate and have found that we have a lot of similar tastes. Can you tell me what size picture frames you used to add the gold touches to and also where you bought the frames? I have found some on Pottery Barn's site but they are quite expensive. Not sure I have to spend that much money.
Thank you, and keep up your wonderful work!
Thanks for sharing your tips. I am going to try it on my Disney frames. I love your honesty….you know it would have been real easy to leave that mistake out. Kudos to you!
You're a genius! I'm definitely going to give this a try!!!
Wow, nice! how did you match up the 2 pieces of tape. straight edge to edge or mitered corners?
Thank you for this great idea!