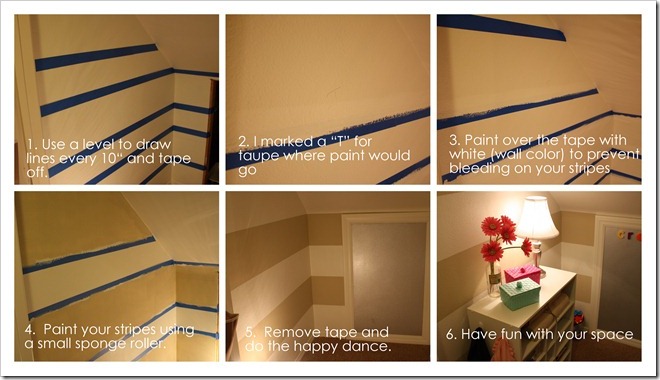
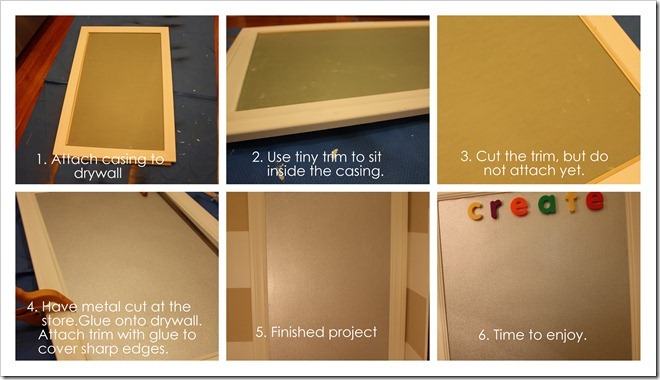
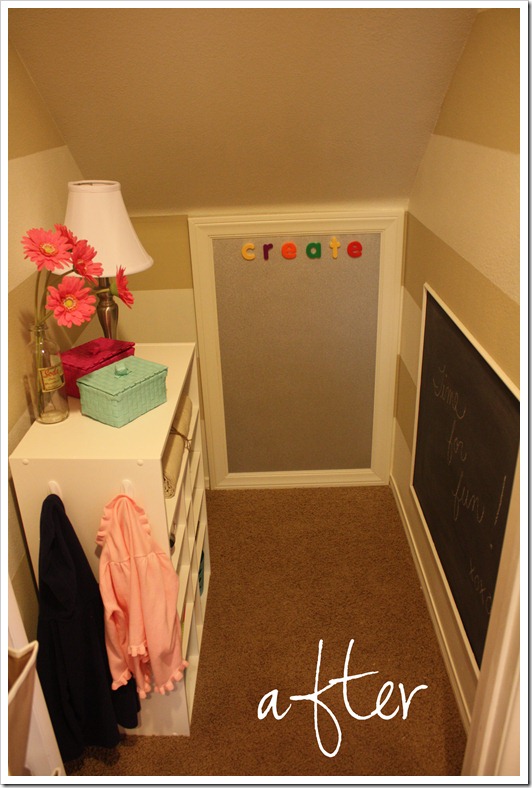
So when we decided to turn the coat closet into a little clubhouse {you can read more here if you missed it} I couldn’t make up my mind on a paint color. Nothing seemed to really work for me. That’s when I remembered stripes I have seen in some of my favorite blogger’s homes. You can check out Megan’s mudroom here and Michelle’s office here. They are gorgeous and I knew stripes would add the perfect amount of personality. I followed the advice of many who have gone before me for painting perfect {or almost perfect} stripes. The key is this: after you tape off the stripes paint over the tape with whatever existing wall color you have. This will bleed through the tape onto the existing wall color {no problem . . .it’s already that color} and prevent the new color from bleeding through. Whoever came up with this is a genius. I really only had about four or five tiny spots to touch up. They all happened to be on a curved portion of the wall where it was impossible to get the tape to lay nicely. For small fixes, I used a tiny watercolor brush. painting perfect stripes  My other tip is to mark a where you want your stripe color to go. It gets a little crazy after a while since you are staring at stripes, tape, and the wall for a while. These were actually really easy to do and I think it makes a big impact. making a magnetic board Our case was a bit unique as we wanted to use drywall since it would serve as the access panel to our new storage space. But no matter what, you can have galvanized metal cut to the size you need. WARNING!!! It is extremely sharp and can cut you. Be sure to handle with care. Once you have covered the raw edges with trim it’s fantastic.
  Here is one last look at our clubhouse.
Oh that's a lovely pair of DIYs…
you got me wanting to paint some walls:)
LOVE those walls!!!!!! Never painted stripes before, but will be referencing this post when I do : )
Have a great weekend,
Paula
GREAT tip on the stripes, I had never heard of painting over the tape to prevent bleeding – genius! 🙂
Love the magnetic board. Great idea!
The magnetic board is just genius! Love it! And the stripes of course 🙂 Thanks for the shout out! Hope you and the crew are feeling better! xo
I love how your play area turned out!
thank you so much for this tutorial! one of these days…i'll be able to paint. in this apartment – ain't gonna happen! 🙂
I had no idea stripes could be so easy. I loooovvee the magnetic board – I like keeping the front of the fridge clear of things so this is a great alternative for magnets and important papers!
I can never get enough of some good ol' stripes tutorials. Love it! 🙂
This gives me courage to try stripes!
Jennifer
http://www.bigdandme.com
Having my first giveaway – Anyone is welcome to enter:)
this looks great! thanks for the tutorials..i think i may try stripes on my little girls room now.
This is such a fantatic room/closet! I do love it!
It is now occurring to me how difficult this must have been to get the stripes right with the angles and slope. It really looks great Courtney!
-Rene
When I get a house of my own where painting is allowed, I'm painting stripes somewhere because this turned out way too cute not to! (:
I must find somewhere in my house to paint stripes!
Love it.
Thanks for sharing these tips on the stirpes, Courtney! I have painted striped on a dresser but never on a wall. I want to find a spot in our house to do that. I love the look.
That "clubhouse" is so adorable and I love your stripes!
Luvs!
You made that magnetic board look so easy to do! You are genius for thinking that up! And those stripes are very cool in there. I hadn't heard of that stripe painting trick before, but makes perfect sense. Thanks for the shout out too:)
I still think the closet redo is genious!! I know the kiddos have got to love it.
So cute, yet doesn't scream "for kids" at the same time. I love it!
Oh my gosh!!! I knew I missed a couple of days, but I didn't know I missed *THIS*!!! It turned out AMAZING and such a perfect place for the kiddos…the stripes totally make it for me (c:
http://loveallthingsbrightandbeautiful.blogspot.com
Great colors on the wall and I love the way you painted the horizontal stripes to open the room up. I have a tool that can make your designs hassle free for your readers. It is called the U-Stripe It & Design Tool. My dad invented it last year and DIY named it one of their Cool Tools for 2010. It helps you create straight lines all the time and takes Time off of your project. http://www.ustripeit.com Painting is way better than wallpaper and using your design ideas with this tool just helps complete the job. Thanks, Phill